In this article, you will learn how you can use SliverGrid.
CustomScrollView is used to create beautiful scrolling experiences by combining different Slivers.
You can create SliverGrid by using three different constructors.
Constructor 1:
This is used to display content dynamically(from a database or API).
SliverGrid({
  Key? key,
  required SliverChildDelegate delegate,
  required SliverGridDelegate gridDelegate
})
An example is discussed below.
Constructor 2:
You can specify the child tile maximum cross-axis extent here.
SliverGrid.extent({
  Key? key,
  required double maxCrossAxisExtent,
  double mainAxisSpacing = 0.0,
  double crossAxisSpacing = 0.0,
  double childAspectRatio = 1.0,
  List<Widget> children = const <Widget>[]
})
Constructor 3:
Specify fix number of children (tiles) on the cross-axis.
SliverGrid.count({
Key? key,
required int crossAxisCount,
double mainAxisSpacing = 0.0,
double crossAxisSpacing = 0.0,
double childAspectRatio = 1.0,
List<Widget> children = const <Widget>[]
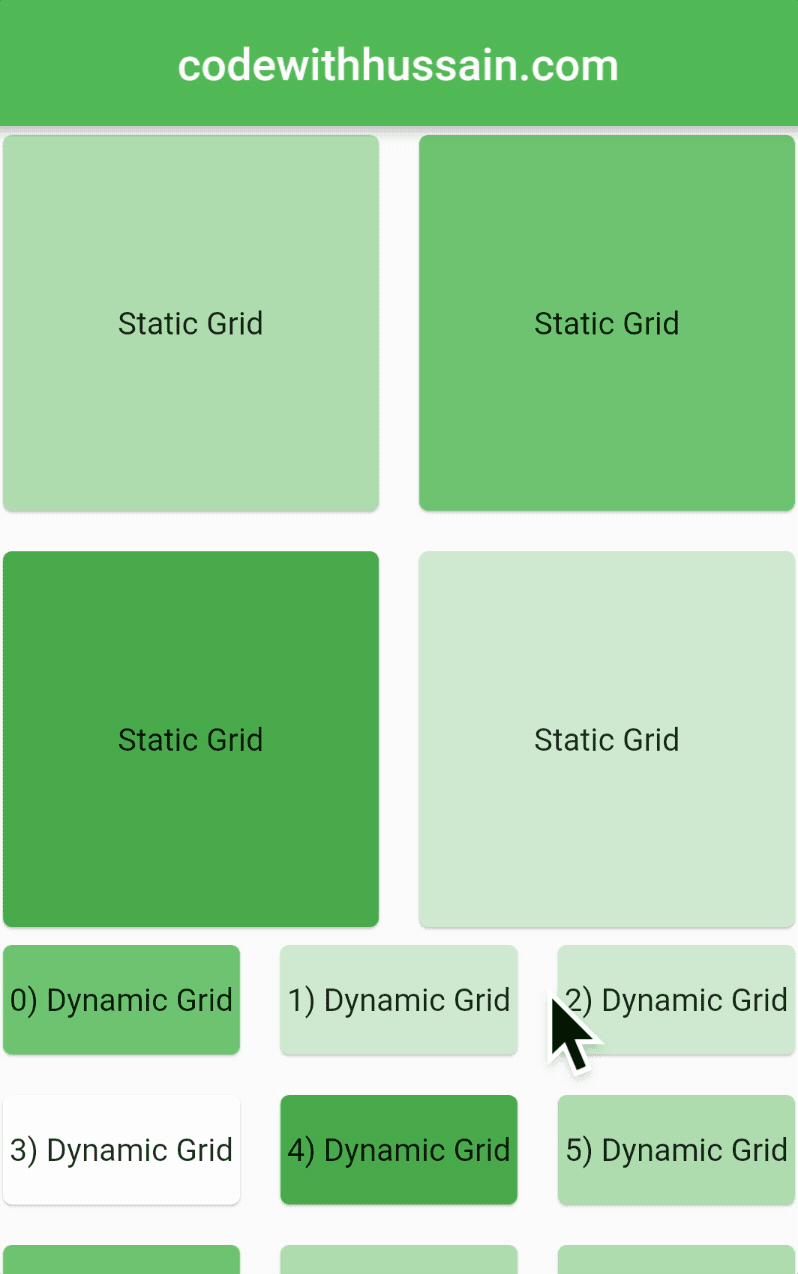
})Example: SliverGrid with Static and Dynamic Data
In this app, you will create two sections of SliverGrid widgets.
- The first large square grid will be created using static data
- The second small rectangle will be generated dynamically
Preview:
App Code:
Check the CustomScrollView section.
import 'dart:math';

import 'package:flutter/material.dart';

void main() {
  runApp(const MyApp());
}

class MyApp extends StatelessWidget {
  const MyApp({Key? key}) : super(key: key);

  @override
  Widget build(BuildContext context) {
    return MaterialApp(
      theme: ThemeData(primarySwatch: Colors.green),
      debugShowCheckedModeBanner: false,
      home: const SliverGridScreen(),
    );
  }
}

class SliverGridScreen extends StatefulWidget {
  const SliverGridScreen({Key? key}) : super(key: key);

  @override
  State<SliverGridScreen> createState() => _SliverGridScreenState();
}

class _SliverGridScreenState extends State<SliverGridScreen> {
  final List _gridItems = List.generate(100, (i) => "$i) Dynamic Grid");
  @override
  Widget build(BuildContext context) {
    return Scaffold(
      appBar: AppBar(
        centerTitle: true,
        title: const Text('codewithhussain.com'),
      ),
//Remember to use custom scroll view
      body: CustomScrollView(
        slivers: [
          // SliverGrid #1
          SliverGrid.count(
            crossAxisCount: 2,
            mainAxisSpacing: 10.0,
            crossAxisSpacing: 10.0,
            childAspectRatio: 1,
            children: [
              Card(
                color: Colors.green[200],
                child: const Center(child: Text('Static Grid')),
              ),
              Card(
                color: Colors.green[400],
                child: const Center(child: Text('Static Grid')),
              ),
              Card(
                color: Colors.green[600],
                child: const Center(child: Text('Static Grid')),
              ),
              Card(
                color: Colors.green[100],
                child: const Center(child: Text('Static Grid')),
              ),
            ],
          ),

          // SliverGrid with dynamic content
          SliverGrid(
            gridDelegate: const SliverGridDelegateWithFixedCrossAxisCount(
              crossAxisCount: 3,
              mainAxisSpacing: 10,
              crossAxisSpacing: 10,
              childAspectRatio: 2.0,
            ),
            delegate: SliverChildBuilderDelegate(
              (context, index) {
                return Card(
                  // generate ambers with random shades
                  color: Colors.green[Random().nextInt(7) * 100],
                  child: Container(
                    alignment: Alignment.center,
                    child: Text(
                      _gridItems[index],
                      textAlign: TextAlign.center,
                    ),
                  ),
                );
              },
              childCount: _gridItems.length,
            ),
          ),
        ],
      ),
    );
  }
}
Conclusion:
You learn how you can use SliverGrid widget in your flutter app. We explore different methods by which we can use SliverGird. More info is available on the official site.
Check these other flutter tutorials
- How to change app package name
- How to show loading dialog in Flutter
- How to get device id in Flutter
- How to create an expansion tile in Flutter
- Flutter ListView examples
I hope you like this tutorial. Thanks!