Device orientation is the device’s app UI position with respect to gravity. It detects the physical orientation of the device and shows the responsive user interface to the user.
Today you will learn how to change the device orientation behavior in Flutter. You can also lock the device orientation so that if the user rotates the physical device the orientation will remain locked as we set in the flutter code.
In this Article
Lock Flutter App Orientation on All Pages
You can lock a flutter app device orientation by following three steps.
- Step 1: Import flutter services
- Step 2: Ensure initialization of flutter bindings
- Step 3: Set preferred orientation (Main Step)
- Step 4: Rebuild the flutter project
Step 1: Import flutter services
You will import the flutter services file which exposes the platform services to the flutter app.
import 'package:flutter/services.dart';Step 2: Ensure initialization of flutter bindings
Now you will ensure the initialization of flutter widget bindings. Remember you will initialize the bindings before the runApp().
Code snippet:
WidgetsFlutterBinding.ensureInitialized();You will initialize the flutter widget binding in the main function of the app.
void main() {
  WidgetsFlutterBinding.ensureInitialized();
  runApp(const MyApp());
}
Step 3: Set preferred orientation
You will also set the preferred orientation before executing the runApp() method.
You set the preferred orientation in the main() function in three steps.
- i. Make
main()async - ii. Define the preferred orientation
- iii. await the orientation call
i. Make main() async
Updated Code snippet:
void main() async{
  WidgetsFlutterBinding.ensureInitialized();
  runApp(const MyApp());
}
Check the async keyword after main() function.
ii. Define the preferred orientation
First look at the code snippet
  SystemChrome.setPreferredOrientations([
    DeviceOrientation.portraitUp,
    DeviceOrientation.portraitDown,
  ]);
Flutter services has SystemChrome class where you can access the setPreffedOrientation() method which takes the list of DeviceOrientation enums.
You can specify:
DeviceOrientation.portraitUp: Vetical Orientation
DeviceOrientation.portraitDown: Vetical Orientation
DeviceOrientation.landscapeLeft: Horizontal Orientaion
DeviceOrientation.landscapeRight: Horizontal Orientation
These enums value list you can pass to the setPreferredOreintation(), so that when you rotate the physical device you can only preview the result that you specify in the list.
For Example:
If you want to show your App UI only Vertical Portrait position, so you can pass DeviceOrientation.portraitUp from the list to the setPreferredOrientations() method.
Code:
  SystemChrome.setPreferredOrientations([
    DeviceOrientation.portraitUp,
  ]);
Complete Code:
import 'package:flutter/material.dart';
import 'package:flutter/services.dart';

void main() async {
  WidgetsFlutterBinding.ensureInitialized();
//this await is discussed in the next part
  await SystemChrome.setPreferredOrientations([
    DeviceOrientation.portraitUp,
  ]);
  runApp(const MyApp());
}

class MyApp extends StatelessWidget {
  const MyApp({Key? key}) : super(key: key);

  @override
  Widget build(BuildContext context) {
    return MaterialApp(
      theme: ThemeData(primarySwatch: Colors.amber),
      debugShowCheckedModeBanner: false,
      home: const DeviceOreintation(),
    );
  }
}
class DeviceOreintation extends StatelessWidget {
  const DeviceOreintation({Key? key}) : super(key: key);

  @override
  Widget build(BuildContext context) {
    return Scaffold(
      appBar: AppBar(
        centerTitle: true,
        title: const Text('CodewithHussain'),
      ),
      body: const Center(child: Text('Welcome to the code with Hussain.')),
    );
  }
}
iii. await the orientation call
You will use the asynchronous dart programming here by using the await keyword.
You can see that in the above code we use the await keyword before the SystemChrome.setPreferredOrientations().
  await SystemChrome.setPreferredOrientations([
    DeviceOrientation.portraitUp,
  ]);
This (await keyword) will make sure that our app has the orientation that we just passed.
Step 4: Rebuild the flutter project
In the Last step you will rebuild the flutter project. Then you can rotate your physical device to see the previews.
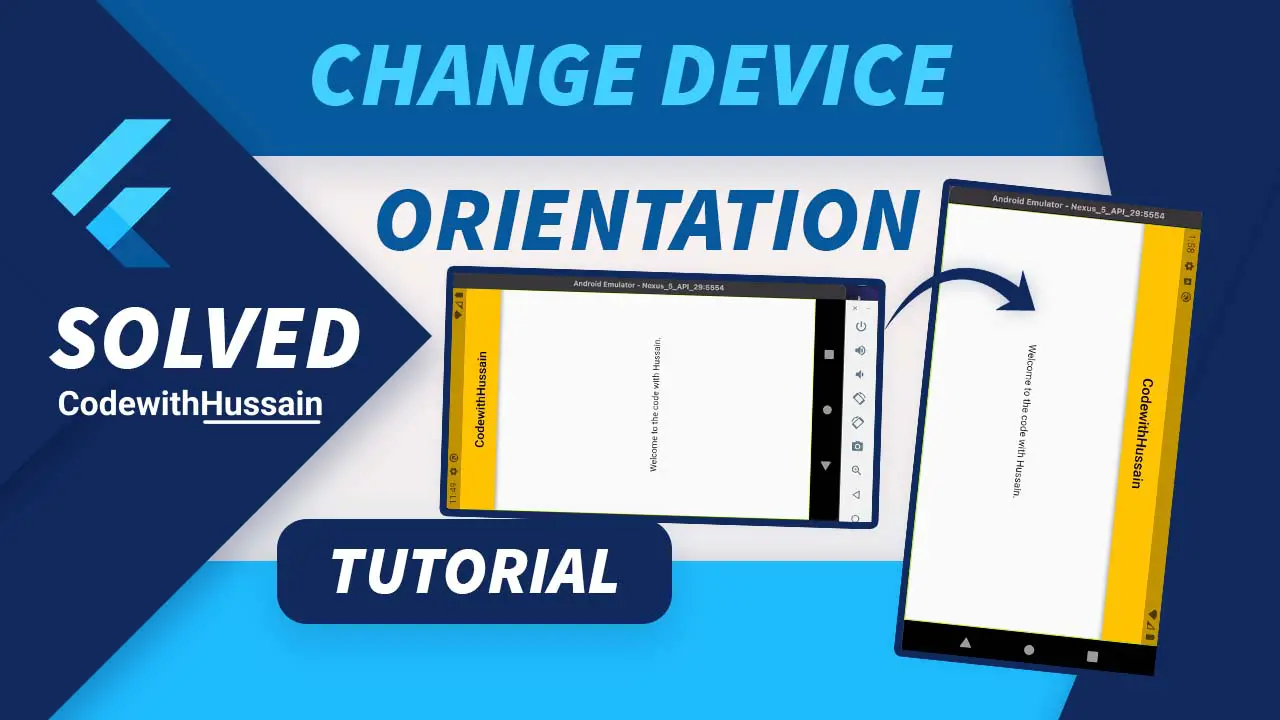
Note: Your app orientation is locked to only that specific position that we specify.
You see how you can change app orientation for complete app which mean any page of app will responds to this setting.
Sometime you want to change the app orientation for a specific page.
Lock Flutter App Orientation on a Specific Page
You can change app orientation for specific page by changing widget to the stateful widget.
As you know when widget load to the screen. It first load the initState() and then widget builds and at the end you can dispose() the widget.
How you can set App orientation in this stateful widget by following these steps.
Let’s create a DeviceOrientation Stateful widget with build() method returning Scaffold Widget.
class DeviceOreintation extends StatefulWidget {
  const DeviceOreintation({Key? key}) : super(key: key);

  @override
  State<DeviceOreintation> createState() => _DeviceOreintationState();
}

class _DeviceOreintationState extends State<DeviceOreintation> {

  @override
  Widget build(BuildContext context) {
    return Scaffold(
      appBar: AppBar(
        centerTitle: true,
        title: const Text('CodewithHussain'),
      ),
      body: const Center(child: Text('Welcome to the code with Hussain.')),
    );
  }

}
You will also specify the initState() method.
  @override
  void initState() {
    super.initState();
    SystemChrome.setPreferredOrientations([
      DeviceOrientation.landscapeLeft,
      DeviceOrientation.landscapeRight,
    ]);
  }
As you already study about the flutter SystemChrome.setPreferredOrientations() service which will change the device orientation according to the specified settings.
Dispose() Can be Super Useful
Good thing is that you can also reset the device orientation settings to the default.
Code Snippet:
@override
  dispose() {
    SystemChrome.setPreferredOrientations([
      DeviceOrientation.portraitUp,
      DeviceOrientation.portraitDown,
      DeviceOrientation.landscapeRight,
      DeviceOrientation.landscapeLeft,
    ]);
    super.dispose();
  }
Here we are allowing device to move UI to any direction that we want.
Check the complete code:
import 'package:flutter/material.dart';
import 'package:flutter/services.dart';


void main() {
  runApp(const MyApp());
}

class MyApp extends StatelessWidget {
  const MyApp({Key? key}) : super(key: key);

  @override
  Widget build(BuildContext context) {
    return MaterialApp(
      theme: ThemeData(primarySwatch: Colors.amber),
      debugShowCheckedModeBanner: false,
      home: const DeviceOreintation(),
    );
  }
}


class DeviceOreintation extends StatefulWidget {
  const DeviceOreintation({Key? key}) : super(key: key);

  @override
  State<DeviceOreintation> createState() => _DeviceOreintationState();
}

class _DeviceOreintationState extends State<DeviceOreintation> {
  @override
  void initState() {
    super.initState();
    SystemChrome.setPreferredOrientations([
      DeviceOrientation.landscapeLeft,
      DeviceOrientation.landscapeRight,
    ]);
  }

  @override
  Widget build(BuildContext context) {
    return Scaffold(
      appBar: AppBar(
        centerTitle: true,
        title: const Text('CodewithHussain'),
      ),
      body: const Center(child: Text('Welcome to the code with Hussain.')),
    );
  }

  @override
  dispose() {
    SystemChrome.setPreferredOrientations([
      DeviceOrientation.portraitUp,
      DeviceOrientation.portraitDown,
      DeviceOrientation.landscapeRight,
      DeviceOrientation.landscapeLeft,
    ]);
    super.dispose();
  }
}Output:
Know you want to change device orientation programmatically which means that when certain event trigger your UI orientation will behave certain way.
How you can add this on demand UI resposiveness in your flutter apps.
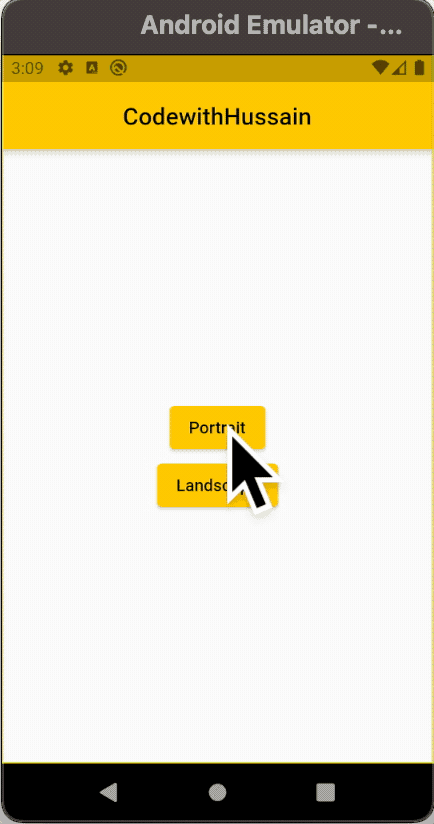
Change Device Orientation Programmatically
Now you will create an example app which has two buttons (Portrait, Landscape) at the center when you press portrait button device orientation will change to portrait and when you press landscape device orientation will become landscape.
First Create a Screen
class DeviceOreintation extends StatelessWidget {
  const DeviceOreintation({Key? key}) : super(key: key);

  @override
  Widget build(BuildContext context) {
    return Scaffold(
      appBar: AppBar(
        centerTitle: true,
        title: const Text('CodewithHussain'),
      ),
      body: Center(
        child: Column(
          mainAxisAlignment: MainAxisAlignment.center,
          children: [
            ElevatedButton(
              onPressed: () {

              },
              child: const Text('Portrait'),
            ),
            ElevatedButton(
              onPressed: () {

              },
              child: const Text('Landscape'),
            ),
          ],
        ),
      ),
    );
  }
}
Now inside the elevated buttons you can use the onPressed property. Here you will use the SystemChrome.setPreferredOrientations() property to set the orientation of the screen on the buttons pressed.
ElevatedButton(
  onPressed: () {
    SystemChrome.setPreferredOrientations([
      DeviceOrientation.portraitUp,
      DeviceOrientation.portraitDown,
    ]);
  },
  child: const Text('Portrait'),
),
ElevatedButton(
  onPressed: () {
    SystemChrome.setPreferredOrientations([
      DeviceOrientation.landscapeLeft,
      DeviceOrientation.landscapeRight,
    ]);
  },
  child: const Text('Landscape'),
),
Both buttons have the logic to move the screen according to the button pressed.
Full Code:
import 'package:flutter/material.dart';
import 'package:flutter/services.dart';

void main() {
  runApp(const MyApp());
}

class MyApp extends StatelessWidget {
  const MyApp({Key? key}) : super(key: key);

  @override
  Widget build(BuildContext context) {
    return MaterialApp(
      theme: ThemeData(primarySwatch: Colors.amber),
      debugShowCheckedModeBanner: false,
      home: const DeviceOreintation(),
    );
  }
}

class DeviceOreintation extends StatelessWidget {
  const DeviceOreintation({Key? key}) : super(key: key);

  @override
  Widget build(BuildContext context) {
    return Scaffold(
      appBar: AppBar(
        centerTitle: true,
        title: const Text('CodewithHussain'),
      ),
      body: Center(
        child: Column(
          mainAxisAlignment: MainAxisAlignment.center,
          children: [
            ElevatedButton(
              onPressed: () {
                SystemChrome.setPreferredOrientations([
                  DeviceOrientation.portraitUp,
                  DeviceOrientation.portraitDown,
                ]);
              },
              child: const Text('Portrait'),
            ),
            ElevatedButton(
              onPressed: () {
                SystemChrome.setPreferredOrientations([
                  DeviceOrientation.landscapeLeft,
                  DeviceOrientation.landscapeRight,
                ]);
              },
              child: const Text('Landscape'),
            ),
          ],
        ),
      ),
    );
  }
}
Check the preview:
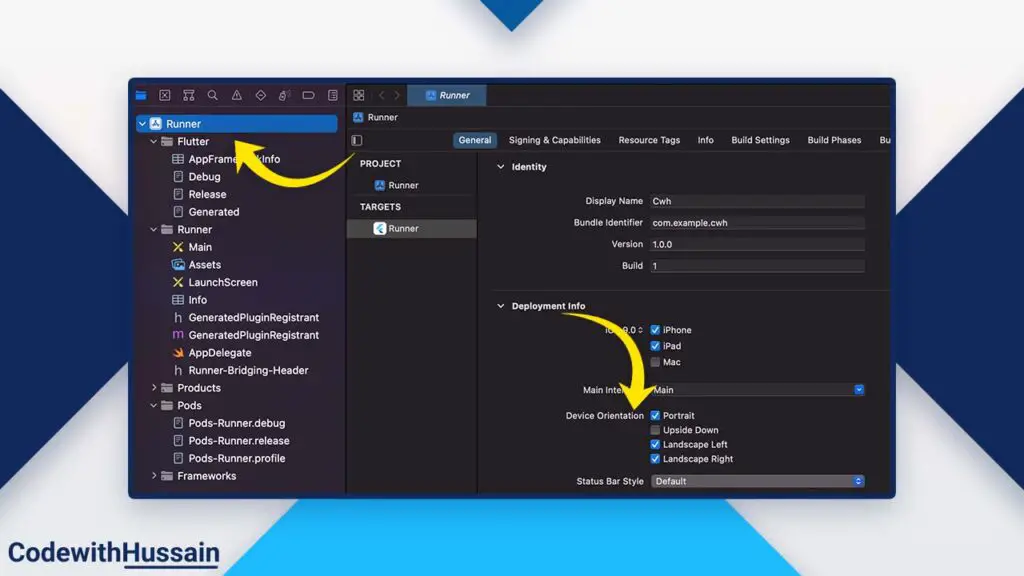
Change Device Orientation on IOS Manually
You can change the device orientation manually on IOS by using xcode or changing runner info.plist file.
Change Orientation Using xcode
- Open Runner.xcodeproj in xcode
- Change the Device Orientation Settings
Changing Orientation Using info.plist
You can also change the same settings from ios/Runner/Info.plist
You can see the <array> inside the file of orientation.
<array>
		<string>UIInterfaceOrientationPortrait</string>
		<string>UIInterfaceOrientationPortraitUpsideDown</string>
		<string>UIInterfaceOrientationLandscapeLeft</string>
		<string>UIInterfaceOrientationLandscapeRight</string>
</array>
Conclusion
You just explored how you can change or lock the Orientation of the App by changing Physical device position. You learn different approaches to solve this problem.
Read More:
- Create Gradient Background
- Form Validation in Flutter
- SizedBox widget in Flutter
- Create Rounded Checkboxes
- Format DateTime in Flutter
- Change Status Bar Color
You can explore more flutter tutorials. Hope this was helpful see you next time.Thanks